Watauga Humane Resources

Pet Parent Resources for Happy Pets!

    Uncategorized

    Your Complete Guide to Puppy Potty Training

    February 25, 2019

    The younger puppies are, the more frequently they have to relieve themselves. Housetraining takes work, but a little training trouble now will save you a lot of cleaning trouble later.

    Get your puppy on the right track as quickly as possible with their potty behaviors by using these guidelines for housebreaking a puppy.ADVERTISING

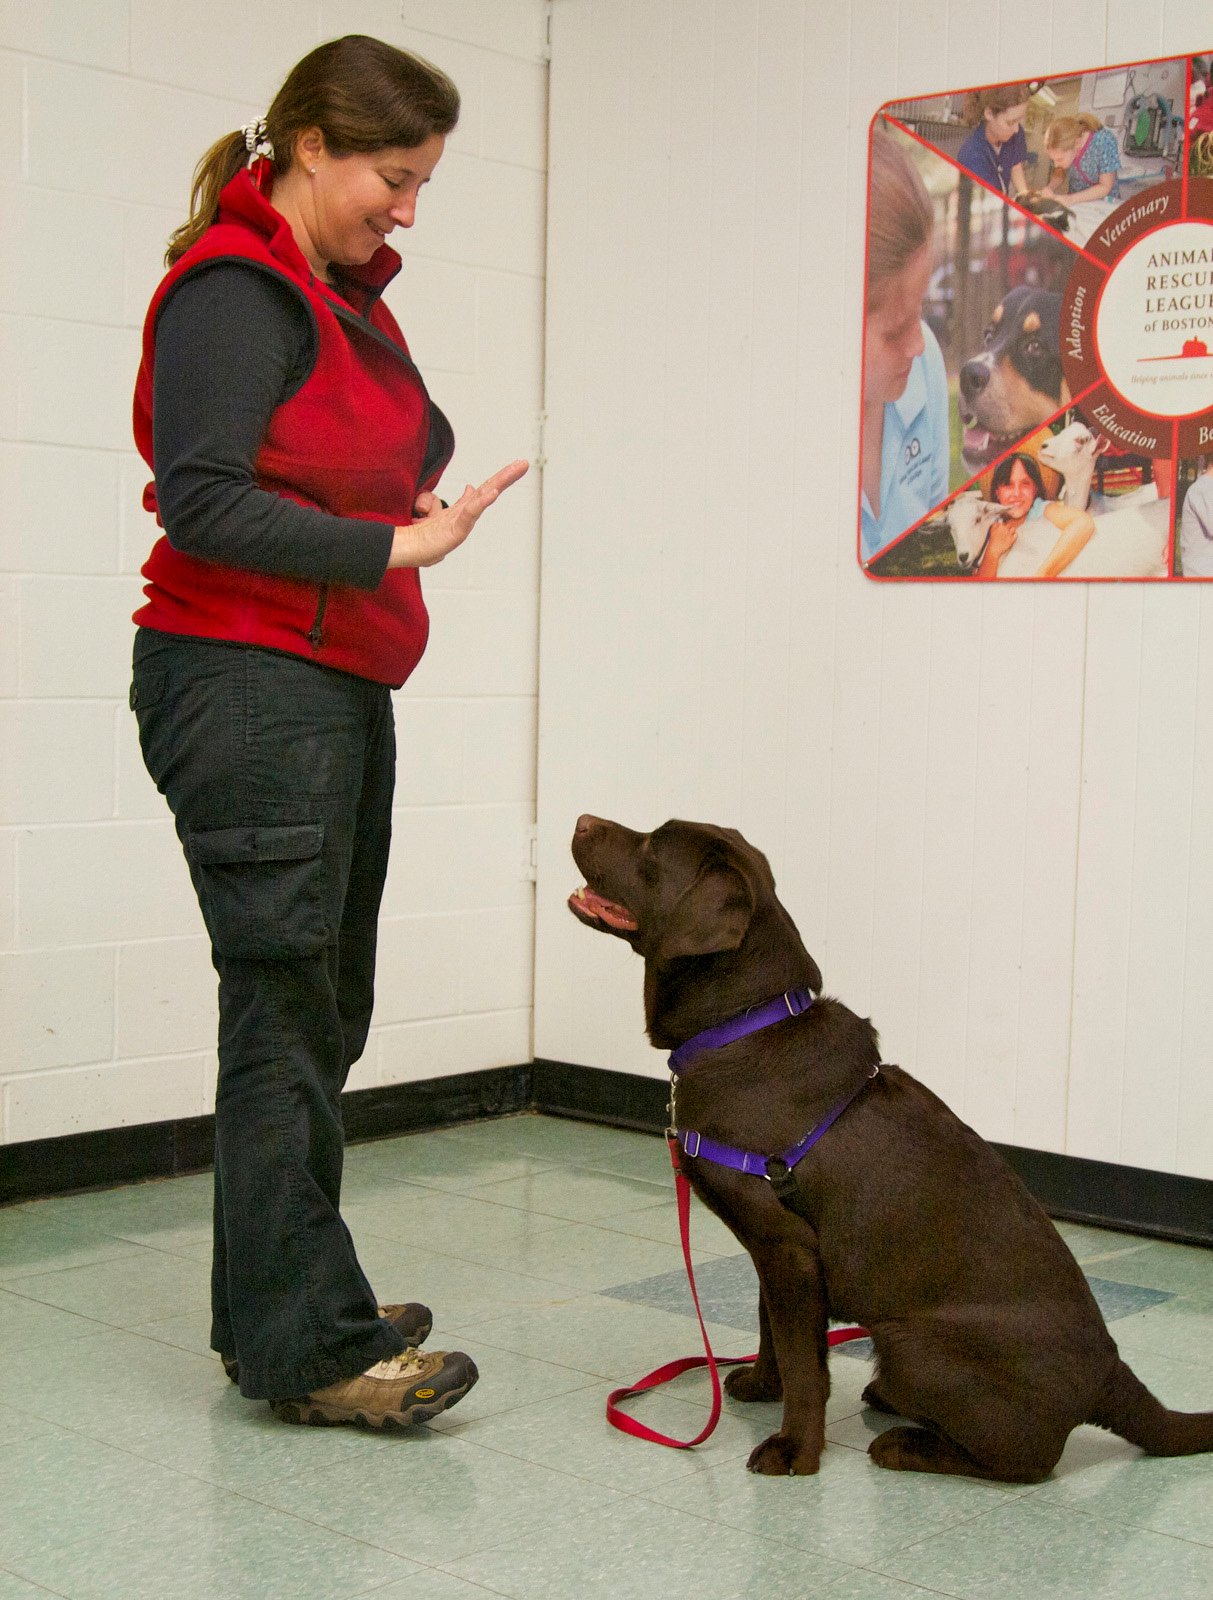
    Be a cheerleader for your pup

    In order to know where they’re allowed to potty, your dog needs your feedback. When your puppy goes in the correct location, celebrate what they’ve done right in a happy voice while offering a delicious treat.

    The affirmation and reward must come immediately after they’ve finished going. If you wait until you return to the house to celebrate and reward them, your puppy won’t understand why they’re being praised.

    Use a crate or confinement space

    While you’re housetraining your puppy, you’ll need a place to put them when you can’t be watching for accidents. This confinement space should be comfortable, with soft bedding, water, and toys, and have a floor that’s easy to clean up or potty pads in case of an accident. Up your game by using a crate for short periods of time.

    Dogs don’t like to lay near their waste, so if your crate is only large enough for your pup to comfortably lie down, stand up and turn around in, they’re unlikely to have an accident inside. Don’t use your crate for longer than three hours at a time during the day, and even less than that if your puppy is very young.

    Avoid punishment

    It may sound contradictory, but if you see a wet spot or a pile on the floor, the least productive thing you can do is punish your puppy. By the time you find an accident, even if it’s only a few minutes afterward, they’ve forgotten what they’ve done.

    Punishing a dog for something they don’t remember doing will only confuse them. If you want to let puppy know that accidents aren’t okay, you need to catch her in the act of pooping or peeing in the house.

    Use a calm tone when they have an accident

    If you see your puppy have an accident, yelling, chasing, or physically punishing won’t be effective. In fact, this sort of behavior is likely to teach them to be afraid of you when they have to potty.

    If they’re afraid of pottying around you, you’ll likely see an increase in hidden accidents.

    Show your puppy the right place to go when they have an accident

    To ensure your puppy understands he’s not to go in the house, you’re going to have to catch him in the act of having an accident. But if you can’t punish your puppy when you catch him, how do you communicate that going in the house is not allowed?

    The answer is “redirection.” When you see your puppy pooping or peeing, quickly interrupt with a phrase like “No!” then immediately and gently take them in your arms or by the collar, and show them to an appropriate location.

    Once you’re outside (or on a puppy pad), wait there with your dog for a couple of minutes. In some cases, if your interruption startled your dog into pausing their business, they may begin again. If so, celebrate your pup with happy words and, if possible, a treat from your pocket.

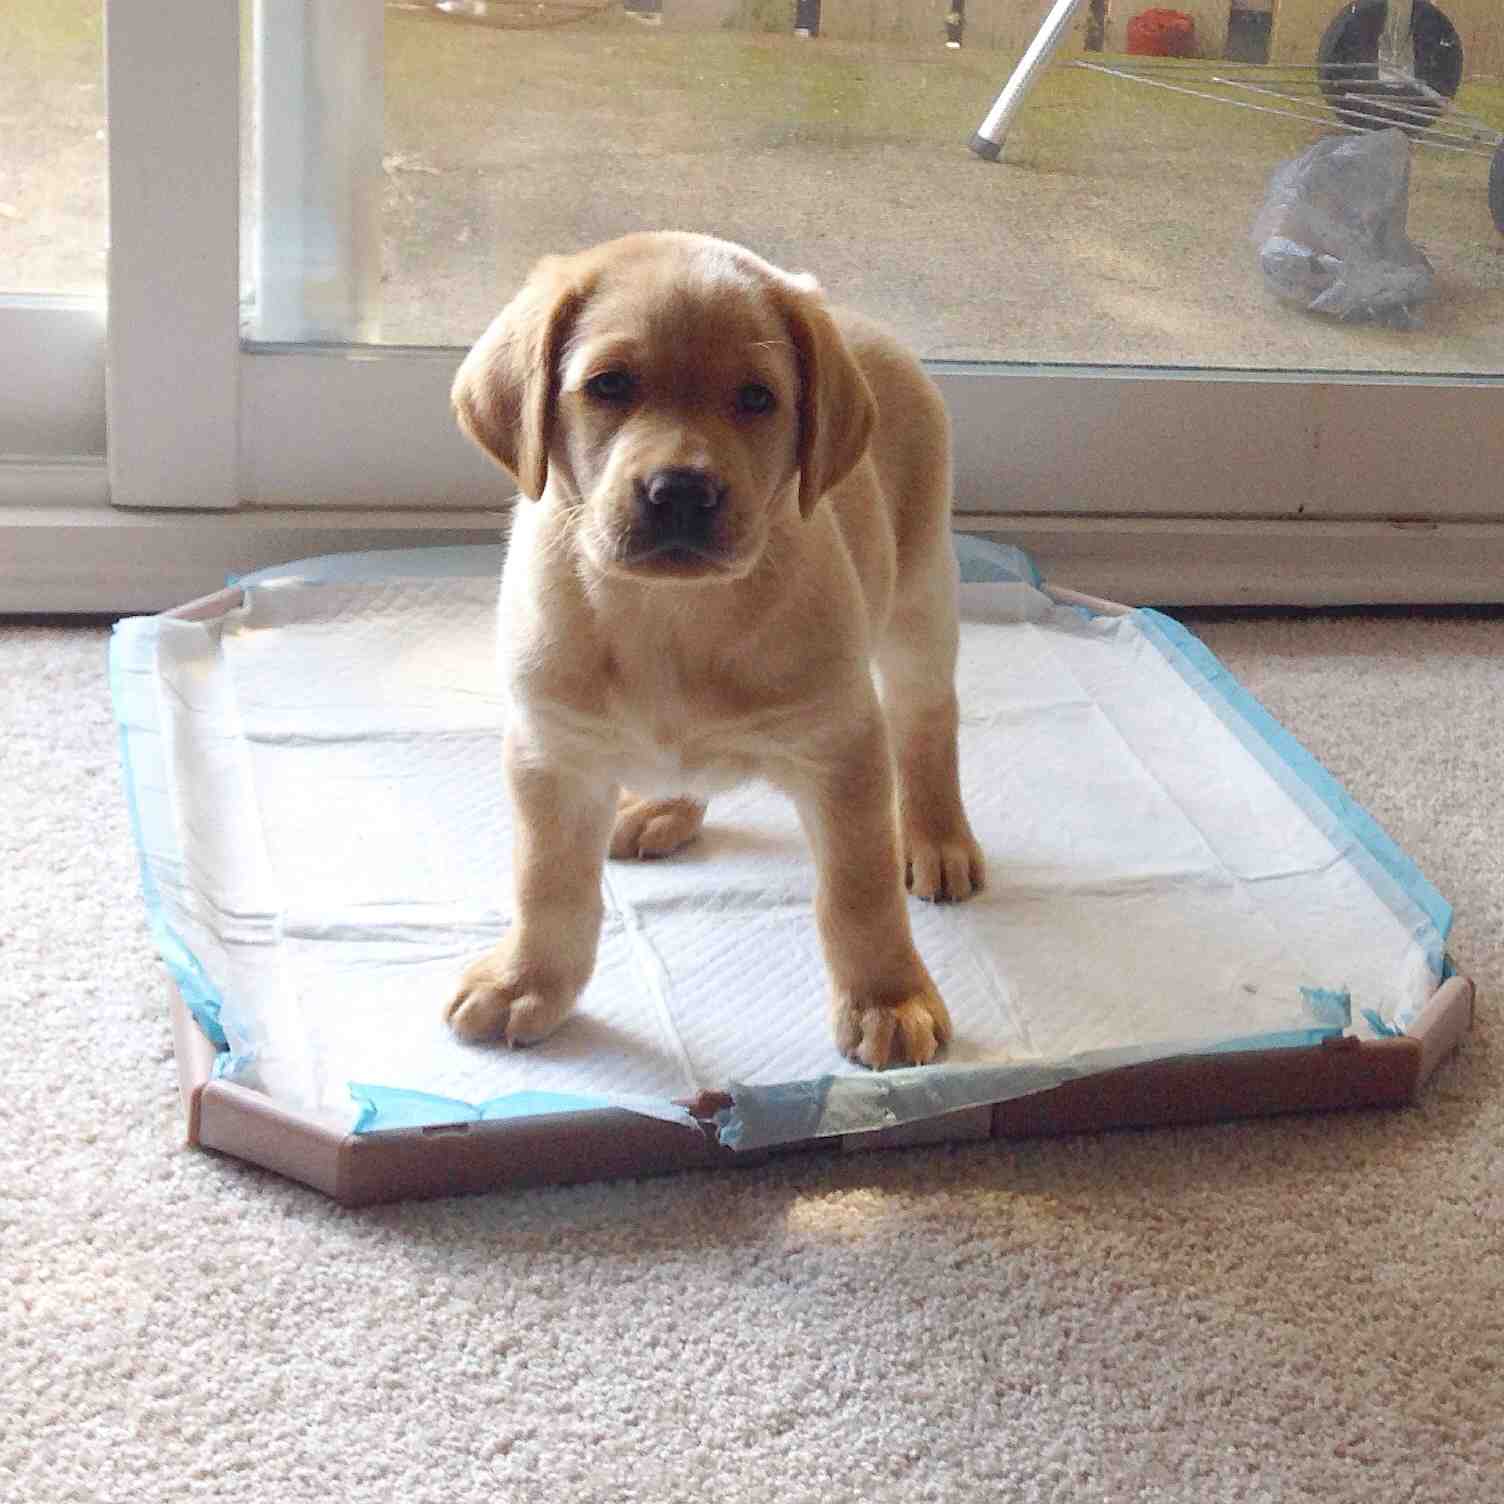
    Use puppy pads in limited areas


    If you’re using potty pads to give your pup a “legal” place to go in the house, don’t place them in multiple spots in the house. This will only confuse your pup, who won’t be able to understand the difference between puppy pads and rugs, or why he’s allowed to go in X number of places in the home but not in others.

    If you want to use potty pads, put them down consistently in only one location—probably within your confinement space.

    Put your pup on a potty schedule

    Dogs have a great sense of time. If you’ve got a schedule for going out every few hours (and more frequently if your pup is very young or very small), once she starts catching on to the rules, she’ll recognize that waiting until the next break means being praised and rewarded for doing her business.

    Remember, the more frequently a dog is rewarded for a behavior, the more frequently they will practice that behavior!

    Original Post: https://www.rover.com/blog/complete-guide-puppy-potty-training/

    Uncategorized

    Declawing Cats: Far Worse than a Manicure

    February 25, 2019

    People often mistakenly believe that declawing their cats is a harmless “quick fix” for unwanted scratching. They don’t realize that declawing can make a cat less likely to use the litter box or more likely to bite. Declawing also can cause lasting physical problems for your cat.

    Many countries have banned declawing. The Humane Society of the United States opposes declawing except for the rare cases when it is necessary for medical purposes, such as the removal of cancerous nail bed tumors.

    People who are worried about being scratched, especially those with immunodeficiencies or bleeding disorders, may be told incorrectly that their health will be protected by declawing their cats. However, infectious disease specialists don’t recommend declawing. The risk from scratches for these people is less than those from bites, cat litter, or fleas carried by their cats.

    The truth about cats and scratching

    Scratching is normal cat behavior. It isn’t done to destroy a favorite chair or to get even. Cats scratch to remove the dead husks from their claws, mark territory, and stretch their muscles.

    Cats are usually about 8 weeks old when they begin scratching. That’s the ideal time to train kittens to use a scratching post and allow nail trims. Pet caregivers should not consider declawing a routine prevention for unwanted scratching. Declawing can actually lead to an entirely different set of behavior problems that may be worse than shredding the couch.

    What is declawing?

    Too often, people think that declawing is a simple surgery that removes a cat’s nails—the equivalent of having your fingernails trimmed. Sadly, this is far from the truth.

    Declawing traditionally involves the amputation of the last bone of each toe. If performed on a human being, it would be like cutting off each finger at the last knuckle.

    It is an unnecessary surgery that provides no medical benefit to the cat. Educated pet parents can easily train their cats to use their claws in a manner that allows everyone in the household to live together happily.

    How is a cat declawed?

    The standard method of declawing is amputating with a scalpel or guillotine clipper. The wounds are closed with stitches or surgical glue, and the feet are bandaged.

    Another method is laser surgery, in which a small, intense beam of light cuts through tissue by heating and vaporizing it. However, it’s still the amputation of the last toe bone of the cat and carries with it the same long-term risks of lameness and behavioral problems as does declawing with scalpels or clippers.

    If performed on a human being, declawing would be like cutting off each finger at the last knuckle.

    A third procedure is the tendonectomy, in which the tendon that controls the claw in each toe is severed. The cat keeps their claws, but can’t control them or extend them to scratch. This procedure is associated with a high incidence of abnormally thick claw growth. Therefore, more frequent and challenging nail trims are required to prevent the cat’s claws from snagging on people, carpet, furniture, and drapes, or from growing into the cat’s paw pads.

    Because of complications, a cat who has been given a tendonectomy may require declawing later. Although a tendonectomy is not actually amputation, a 1998 study published in the “Journal of the American Veterinary Medical Association” found the incidence of bleeding, lameness, and infection was similar between tendonectomy and declawing.

    Some negative effects of declawing

    Medical drawbacks to declawing include pain in the paw, infection, tissue necrosis (tissue death), lameness, and back pain. Removing claws changes the way a cat’s foot meets the ground and can cause pain similar to wearing an uncomfortable pair of shoes. There can also be a regrowth of improperly removed claws, nerve damage, and bone spurs.

    For several days after surgery, shredded newspaper is typically used in the litter box to prevent litter from irritating declawed feet. This unfamiliar litter substitute, accompanied by pain when scratching in the box, may lead cats to stop using the litter box. Some cats may become biters because they no longer have their claws for defense.

    Try our tips for stopping unwanted scratching

    If you are worried about your cat damaging your home, or want to avoid unwanted scratching, start with these tips:

    • Keep their claws trimmed to minimize damage to household items.
    • Provide stable scratching posts and boards around your home. Offer different materials like carpet, sisal, wood, and cardboard, as well as different styles (vertical and horizontal). Use toys and catnip to entice your cat to use the posts and boards. 
    • Ask your veterinarian about soft plastic caps (like Soft Paws®) that are glued to the cat’s nails. They need to be replaced about every six weeks.
    • Attach a special tape (like Sticky Paws®) to furniture to deter your cat from unwanted scratching.

    Sticky Paws on Amazon.com

    Nail Caps on Amazon.com

    Don’t subject your cat to unnecessary procedures

    Declawing and tendonectomies should be reserved only for those rare cases in which a cat has a medical problem that would warrant such surgery, such as the need to remove cancerous nail bed tumors.

    Scratching Posts on Amazon.com

    Original Post: https://www.humanesociety.org/resources/declawing-cats-far-worse-manicure

    Uncategorized

    Living in a Multicat Household

    February 25, 2019

    Cats can be social animals, however, not every cat will get along with every other cat. This can manifest itself in a number of ways from outright aggressive behavior to food issues, inappropriate elimination, scratching and overgrooming.

    If you live in a multicat household you should become adept at reading the body language of the felines in your family. If there is a change in the social structure, it will become quickly apparent.

    Many outside influences can impact on the interaction of cats. Some are: stress level of the human family, new family members or pets, parties, houseguests, job changes which impact time spent at home, illness or remodeling.

    Another factor in the relationship of cats in your family is the relative health of each cat. Any change in behavior that does not have an obvious cause, should be considered worthy of a health check-up to rule out illness first.

    All cats are territorial, and should have some space in the household that they can call their own. This can be as elaborate as a cat tree, secure outdoor enclosure, cat condo, or as simple as a cardboard box with a hole cut in it, or a bed on top of the refrigerator. If the cat feels secure in it’s own territory, then communal territory is much easier to share.

    The concept of territory expands to litterboxes as well. Often the dominant cat in a household will not bury his/her eliminations, thus “marking” “ the litterbox as their territory. Other cats will be reluctant to use this box, especially if they have a submissive personality.

    A solution to this issue is to provide multiple litterboxes in more than one location in the house. Scooping litterboxes regularly will also help the submissive cat feel more secure in the box.

    A cat with a dominant personality will need places to mark their space via rubbing and scratching. Scratching posts of various textures from cardboard, to carpet to sisal in various locations in the home will provide an outlet for this behavior without sacrificing valued carpets and furniture.

    Cats are amenable to training with positive reinforcement. The judicious use of treats, play and attention when cats are interacting appropriately can establish your position as the dominant personality in the house. This will encourage peaceful interaction between feline family members.

    It may be impractical to expect all cats to get along to the point of sleeping together, or grooming each other, but with close attention to environment, body language and training cats can learn to coexist peacefully.

    If you are faced with two cats that are openly antagonistic towards each other, the first step is to separate the cats completely. Separate rooms with closed doors will allow the situation to “cool off”. A gradual period of reintroduction should follow. Start with allowing the cats to sniff each other under the door. Follow this up with visits to each others “space” to sniff bedding, etc. Each forward step should be followed with quiet time in separation to allow the cat to “process” those scents. Products such a Feliway™ can be used to mark each cat with the facial pheromones of the other to decrease their stress levels.

    Multi-Cat Households Behavior Checklist

    • Does each cat have its own litterbox?
    • Does each cat have some “private space” as their own territory?
    • Are food and water accessible on neutral territory not claimed by any cat?
    • Are cats rewarded with treats, extra attention when they interact calmly?
    • Are all the cats healthy? If not, have special space been set aside for the ill cat to recuperate without stress?
    • Are there acceptable scratching surfaces available for the cats?
    • Are there any new changes in the family which could account for a change in behavior?
    • Are there any new cats in the neighborhood that could be adding stress to a relationship? Even indoor cats notice outdoor cats in their yard.
    • Do cats have opportunities for exercise and mental stimulation? Toys, birdfeeders and active play with human family members will provide a needed outlet for excess energy.

    The Snug Retreat

    For the smaller household, or the family with ongoing cat interaction difficulties, a “snug retreat” may be a solution to intercat aggression problem.

    A snug retreat is a large enough enclosed space- usually a medium sized dog crate, which can house a cat bed, litterbox and water bowl. This space is used for several hours each day to allow the cat to relax in a stress free environment. When the cat is not in the retreat the door is kept closed so that no other cat has access to the litterbox inside.

    Many cats look forward to sleeping in a snug retreat and will run to their bed at night. Some cats prefer to have their snug retreat covered with a blanket or the like to make it seem more “cavelike” other prefer to have the visibility of open sides.

    A cat will be happier to use their snug retreat if it is also used as a place where they can get cat treats, or that is lightly scented with catnip.

    If you have a cat who is older, or ill, or a young cat newly separated from it’s mother and littermates, putting a hot water bottle or heated rice bag in the snug retreat will make it even more comforting. Electric heating pads should be used with caution to avoid burns with elderly or ill animals, or kittens who may chew on cords.

    Original Post: https://pawsbink.org/pet-care-library/living-in-a-multicat-household/

    Uncategorized

    How to Train Your Dog for the Trail

    February 25, 2019

    Want to take your pups hiking? Keep them safe—and make them good ambassadors for caninekind—with these basic training tips.

    Linda Mullally – May 9, 2017

    outdoor dogs
    Stewart Black

    Adapted from Hiking and Backpacking with Dogs, by Linda Mullally. Check out the full book here.

    There are cultures where it is accepted for dogs to roam all day and come home for dinner and a bed. But in our society, with an ever-increasing number of dogs in closer urban quarters, managing dog behavior is also about respecting other people’s space. This also applies to the hiking trails, where there are an increasing number of people with dogs who want to escape to nature on weekends and holidays. 

    On one hand, it’s wonderful to see more people embracing the outdoors in the company of their dogs. But more trail users also means more pressure on the environment, wildlife habitat, and each other. 

    Not everyone likes dogs, and not every hiker and backpacker is in favor of sharing the trail with dogs. Hikers and backpackers with dogs carry an extra responsibility: A well-behaved dog with obedience training promotes positive PR. On the other hand, the nuisance and hazards of a few uncontrolled dogs can result in all dogs being banned from the trail. 

    Once you step out of your yard and onto the trail, everything your dog is and isn’t reflects on you and impacts other people, animals, and the surrounding environment. Basic obedience skills are essential on the trail.  

    Your Dog’s Trail ABCs 

    Appropriate behavior around everyone on the trail. 

    Basic repertoire of verbal and/or hand signal commands, including sit, down, stay, and come.

    Controls his impulses and responds to commands (verbal or hand signals) in spite of the distracting sights, sounds, and smells of the trail. 

    Good Manners and Lifesavers 

    Use the word “off” when training your dog not to jump on people or dance on furniture. “Down” should be used strictly for lying down. It is unrealistic to expect an exuberant pup to respond to the “down” command under highly excitable circumstances. The best you can expect is for your dog to learn to display her excitement with all four paws touching the ground and stay “off.” 

    Teach your dog that when you say “stay” or “wait” when opening the car door, he should remain in the open vehicle until his leash is on and you’ve given the command that it’s okay to jump out. 

    Making a habit of having your dog sit and stay before a treat, coming in the house, stepping out of the house, or eating his food is a good impulse control exercise.

    Training Options 

    There are several good training books available in the library, bookstores, pet supply stores, and online. The two main advantages of training your dog yourself are control of the training schedule and the minimal cost.

    Having said that, it’s more likely that novice dog owners intending to train their dog on their own with the help of a book will experience frustration, confuse their dog, create more bad habits than good ones, and inflict unnecessary stress on themselves and the dog while straining the relationship.

     The time and money invested in a puppy class followed by at least basic obedience in a group environment will give you invaluable rewards. Besides being introduced to basic commands, your pup will learn to walk on a loose leash.

      Puppy classes and beginner’s obedience classes are as much about “training” people as they are about “molding” your dog’s behavior. This is where a qualified instructor teaches you to read your dog and give positive, clear messages to elicit the desired behaviors before you fall into the trap of having your dog “train” you or worse—having your murky communication foster a chaotic dysfunctional relationship that makes both dog and owner miserable. 

    Group class schedules are available through kennel clubs, pet supply stores, and animal shelters. 

    The old adage that the dog owner is the “master” and dogs need to be “dominated” is archaic and thankfully passé as a basis for training. A good class emphasizes positive, reward-based techniques. You and your dog are a “pack” (a family of two or more), and you are the pack “leader” the dog learns to trust because you set the course with aplomb and consistency. 

    The Importance of Being Consistent 

    Inconsistency breeds unpredictability. Rules and routines should be the same on the trail as they are at home. No should mean no anywhere. You don’t want your dog testing you on the trail, where a rebellious act could put her life at risk or jeopardize someone else’s safety.

    Do reward your dog with a pat or a treat when he responds to a command. 

    Don’t use your dog’s name in a reprimand or call your dog to “come” to give him a reprimand. His name and the word come should be strictly associated with positive, pleasurable experiences. 

    Potty-Training Tips for the Trail 

    Conditioning your dog to relieve himself on command on-leash is a valuable habit on the way to the trailhead or anytime you may need to monitor where your dog relieves himself during the hike.

    Begin at home by taking your dog outside on a leash at routine elimination times to the designated area. Use a short command phrase like “go potty,” “hurry up,” or “get busy” as your dog relieves himself, avoiding an overzealous tone that could distract him from business. Reward your dog with a pat, enthusiastic praise, and a treat.

    Original Post: https://www.backpacker.com/skills/how-to-train-your-dog-for-the-hiking-trail

    Uncategorized

    The 7 Most Important Dog Training Skills

    February 25, 2019

    Dog training is a lifelong process, but some skills are more important than others.  Think of mastering these essential dog training skills as laying the foundation, and preparing your dog for a lifetime of good behavior and companionship.

    Whether you just brought home a puppy, adopted a shelter dog, or want to brush up your old dog’s training, these are the absolute most important skills to teach your dog (and yourself).

    Before you start, it’s a good idea to review the basics of dog training: be patient, be positive, mind your body language, work in bursts (10-15 minute training sessions at a time), and add variety to help your dog respond reliably in any situation.

    House Training

    training-potty-pad

    VIA REDDIT

    Potty training is all about consistency, patience, and positive reinforcement. Start with the basics:

    • Supervise your dog. When you’re just starting to house train her, limit her access to other parts of the house, whether that means closing off doors to bedrooms or crate-training so she has her own space.
    • Set a routine. Dogs are creatures of habit. By feeding your dog at the same time each day and offering regularly spaced walks and outside potty breaks, you can condition her to “go” at set times each day.
    • Never punish your dog for eliminating indoors. Accidents happen, and dogs don’t understand cause and effect the same way people do. Clean up the mess, remind yourself that it will get better the more consistent you are and move on.
    • Reward your dog for getting it right. Give her a treat as soon as she goes potty in the designated spot.

    For more detailed tips on housetraining a puppy or dog, check out this trainer’s complete guide.

    Successful dog training is all about consistency, patience, and positive reinforcement.

    Come

    Coming when called is one of the most important skills for your dog to have on lock, because it can keep her safe in potentially dangerous situations. “Make it a party” every time your dog comes when called. No matter what they’re leaving behind, coming to you should be the best thing that happens to them all day!

    To train your dog to come when called, start on leash in a quiet area. Back away from your dog while enthusiastically telling her to “come!” Only give the command once, but be enthusiastic, and keep your body language relaxed and open. You can show your dog a treat to encourage her to head your way. Once she starts towards you, say “yes!” (or click) and reward her with a treat.

    Over time, you can gradually increase the distance between you and your dog, and start practicing in a variety of situations. View our trainer’s guidefor more tips to teaching your dog to come when called.

    Stay

    Teaching your dog to “stay” isn’t only about getting them to sit still. Like “come,” it’s a command that can keep her safe from harm.

    training-stay

    VIA ANIMAL RESCUE LEAGUE BOSTON

    Build on your dog’s “stay” skills with the Three D’s of training:

    • Distance
    • Duration
    • Distraction

    Start up close to your dog, placing her in a sit or down position. Hold a hand out toward and say “stay.” After a moment, reward her. Repeat this until your dog gets the idea that she’ll get a treat if she holds her sit or down position.

    Over several training sessions, increase your distance from your dog and the duration before you release her, and introduce distractions to test her resolve. Visit this puppy training guide for more detailed instructions.

    Remember the three D’s of training: distance, duration, and distraction

    Leave It

    The “leave it” command is another essential for keeping your dog safe, whether from something they might pick up and swallow or another dog growling at them from across the street. It’s also a skill that takes time and consistency to master, so be sure to take it in gradual steps, building on the three D’s mentioned above.

    To teach “leave it,” start with a treat in hand and your dog in a sit or down position:

    • Show your dog the treat, say “leave it,” then place it under your shoe.
    • Wait. Your dog will try to get the treat — sniffing, licking, even pawing at your foot. Let her try. When she eventually gives up, immediately say “yes!” and give her a treat from your hand (not the one still under your shoe!)
    • Repeat. Your dog may go back to sniffing around your foot; as soon as she stops and looks away, mark the desired behavior with “yes” or a click, and reward.

    Once your dog has mastered the art of ignoring a hidden treat, you can work up to a treat in plain view, and eventually “leaving” more compelling distractions. Then, put the training in motion by asking her to walk past and “leave” other the floor. See this article from trainer Shoshi Parks for detailed instructions.

    Sit


    Useful in so many situations, “sit” is often the first command dogs learn. In fact, most dogs “sit” on their own, so all you have to do is connect the command to the behavior.

    First, while your dog is in a standing position, hold a treat in front of her nose and raise it slowly towards the back of her head. When her head follows the treat up, her butt will go down. Once her butt hits the floor, say “yes!” and give her the treat.

    Once your dog is sitting reliably with the treat lure, you can transition to a hand signal and verbal command. View the above video from the AKC for a clear explanation of the whole process.

    Most dogs ‘sit’ on their own, so all you have to do is connect the command to the behavior

    Down

    VIA FLICKR/106635966@N07

    Like “sit,” you can start training your dog the “down” cue with a treat lure.

    • Start with your dog sitting in front of you
    • Hold a treat near her face.
    • Move the treat straight down to the floor, and then slowly away from the dog. She will follow the treat by moving her front feet forward, eventually lying down.
    • Be clear with your movements, and be patient! Once your dog lies down, say “yes!” and give her the treat.
    • Repeat.

    Settle

    trainnig-sit-stay

    VIA FLICKR/WILDSTRAY

    Teaching your dog to “settle” on command is an awesome way to help an anxious or fearful dog manage emotional reactions. As with sitting, settling is something dogs do on their own. Your job here is to connect a cue to a familiar behavior.

    To start training your dog to “settle,” leash her up and take a seat. Step on the leash so your dog has only enough room to sit, stand, and turn around, but not stray from your side. Then, wait. Your dog may be excited at first, and try to jump up on your lap or run around the room. Let her figure out that she can’t go anywhere. Once she settles down on her own, say “yes!” and give her a treat.

    After your dog is settling on her own, it’s time to add in the cue. You’ll start by saying it after your dog is already settling, then gradually “back up” the cue to the beginning of the process.

    The “settle” command helps anxious or fearful dogs manage their emotional reactions.

    Laying a solid training foundation will make life with your dog easier and more fun. If you’re not sure where to start, sign up for an in-person obedience class; there’s no better way to train your dog than to practice with an expert IRL. You can also follow any of the helpful links above, and check out our blog archives for additional tips and tricks.

    Top image via flickr/quinndombrowski

    Original Post: https://www.rover.com/blog/important-dog-training-skills/

    Uncategorized

    Litter Training

    February 25, 2019

    Learning how to use the litter box is an important part of early feline development, but “training” is a bit of a misnomer! Kittens naturally understand the litter box and will be drawn to use it as long as you provide them the proper encouragement. Here’s what you need to know about helping get kittens on the right path.

    1. INTRODUCE LITTER AT THE RIGHT TIME

    Newborn kittens need to be stimulated to go to the bathroom, and won’t start using the litter box until around 3 weeks of age. Once the kitten has reached 3 weeks, it’s appropriate to introduce them to the litter box. Every kitten develops at a different pace, so be patient with the kitten and continue stimulating until you’re confident she is using the litter box with regularity. 

    2. CHOOSE A LITTER THAT IS KITTEN-SAFE

    Kittens learn and explore in the same way human babies do–with their mouths. This means that you’ll need to choose a litter that is safe for kittens so that they don’t consume something toxic or dangerous. Kittens should not be given litter products that contain fragrances, harsh chemicals, or clumping properties. While clumping litter might be the standard for adult cats, it’s a risk to kittens if ingested, and should not be provided until the kitten is at least 2-3 months old and well accustomed to the litter box.

    Instead, opt for a natural, pellet-based litter that is less likely to be inhaled or ingested by a young kitten. 

    3. CHOOSE THE RIGHT BOX 

    Kittens require an open-top, shallow litter box that is easy for them to access and locate. Eliminate obstacles such as tall or covered boxes and provide something that is easy for them to walk in and out of until they’re big enough for an adult litter box. For very young kittens under 8 weeks old, you can even use a cardboard tray (such as those used for canned kitten food) to provide a shallow lip for the tiny kitten to walk over. 

    4. CHOOSE THE RIGHT PLACEMENT

    Equally important is the placement. Kittens tend to be drawn to corners or other areas away from their main home base, so start by placing the litter box in a corner that is clean from clutter. A puppy pad placed under the box will make clean-up easier, as they can be messy learners. 

    When litter training kittens, you want to make it extremely easy for them to find a litter box at all times. Kittens have a natural drive to cover their waste, and will look for the most convenient space to do so. This means you’ll want to keep them near a box throughout the duration of their transition, and avoid providing any messy areas such as piles of laundry where the kitten might develop bad habits. Ideally, a 3-8 week old kitten learning to use a box should be confined to one room so that they can easily find the litter box at all times. For older kittens acclimating to a larger space, it’s best to offer multiple options so that the kitten is always within 10 feet of a litter box. 

    5. USE POSITIVE REINFORCEMENT

    Kittens do well with positive reinforcement–not punishment. Provide praise when kittens use the box correctly!

    If the kitten uses an area outside of the box, immediately clean and disinfect the area to avoid scent soaking or scent associations. If the kitten is using bedding or laundry, keep these items off the floor. If a kitten is frequently using the same location, place a litter box in the location. In some cases, switching to a new litter or using a product like Kitten Attract can help kittens who are truly struggling to understand the box. 

    6. KEEP IT CLEAN

    No one wants to use a dirty toilet, and cats are no different! Clean the box throughout the day (once a day at a bare minimum) to encourage them to continue forming good habits. A clean box is more pleasant for you and for them, and will keep them coming back every time they need to use the bathroom. 

    Original Post: http://www.kittenlady.org/litter

    Uncategorized

    Transitioning Your Pet’s Food

    February 25, 2019

    Gradually Mix the Food


    It is important to change diets gradually.  Switching foods too quickly can cause vomiting, diarrhea, or excess gas.  Unlike humans, dogs and cats often eat the same diet for months or years, and their digestive systems are not as used to change.

    If at any time during transition, your pet experiences gastro-intestinal upset, keep the ratio of old to new food the same for several days.  This will allow your pet to adjust to the new ratio before you incorporate more new food.  This is just a guideline, and you can increase transition time if your pet is particularly sensitive.

    The following is recommended when switching to dry pet foods.

    •  Decrease the amount

    When switching to a higher quality dog food, the food is often times more nutrient dense.  This means that the food is higher calorie per cup, so the pet gets the same number of calories in less food.  If you give your pet the same amount of a higher quality / higher calorie food, it can cause diarrhea and/or weight gain from over-feeding.  Use the back of the bag as a guideline for feeding recommendations, but remember that usually those recommendations aren’t one size fits all, and an average pet may need less to maintain their ideal body weight.

    • Measure

    Use an actual dry measuring cup to correctly portion your pet’s food. 

    A food scoop, coffee mug, drinking cup, or big gulp container are not all equal!  Using the wrong size ‘cup’ can result in overfeeding, which in turn can cause loose stool.  In addition, remember that feeding guidelines give the total amount to be fed per day, not for each meal

    • Add Digestive Aids


    Mix in some pumpkin – Plain pumpkin is a great source of soluble fiber, and can help prevent digestive upset.

    Add a probiotic – Anytime a dietary change is made, the delicate balance of bacteria in a pet’s digestive system can be altered.  Adding some of these beneficial bacteria can help the digestive system adjust to the new food and help prevent gas or other gastro-intestinal upset.

    The “Cold Turkey” Switch

    In some cases, a slow transition is not possible.  If the pet has been sick on the old food, or if the old food is unavailable, you may have to switch foods without mixing.  Another exception to a gradual switch could be switching from a grain based kibble, to a grain free kibble or raw diet.  Grains digest more slowly than an all meat diet, and sometimes when the two are mixed, the different rates of digestion can cause digestive upset. If a gradual change isn’t working or isn’t possible, the following is recommended:

    1. Fast your pet for a day – Skip one meal so their stomach is empty and ready to digest the new food.  Don’t skip more than one day though, especially with cats!

    2. Feed less – For just the first day, feed about half their normal amount.  This will keep pets from getting too much new food at once.

    3. Add digestive aids – Pumpkin and probiotics are always recommended with a “cold turkey” switch.

    Things to Remember

    • Give it time – if you notice any issues, go back a step or transition more slowly.
    • Not one food is best for every pet – just because a food has great ingredients, or you like something about it, does not mean your pet will do well on it.  If you follow the steps above, and your pet is not thriving, pick a different food.
    • Allergies or skin & coat issues can take up to three months to resolve completely.  If your pet does well with the food transition, give those other issues some time to get better.
    • Change in stool – you may notice a change in the appearance of your pet’s stool even after the transition period.  This is normal and can be a result of the change in the amount of fiber and protein in the new diet.
    • Consult with your veterinarian – If your pet has loose stool for more than a day or two, shows other signs of gastro-intestinal distress, or just isn’t acting like their normal self, never hesitate to get them checked out by their veterinarian.

    Original Post: https://www.petpeoplestores.com/transitioning-your-pet-s-food.html


    Uncategorized

    Introducing Cats to Cats

    February 25, 2019

    Some people say cats are like chips — you can’t have just one! As one of the 85 million1 cat owners out there, you may be considering adding a new feline friend to your home. Whether your current cat is lonely, her companion cat recently passed away or you simply love cats, it is important to take a few precautions to ensure that your cat-to-cat introductions go as smoothly as possible.

    FINDING A CAT

    Where to look:

    American Humane strongly recommends adopting a cat from a local animal shelter. Millions of wonderful cats enter animal shelters each year, but tragically, 71 percent are euthanized because there are simply not enough homes for them.2 A wide variety of cat breeds, sizes, colors and personalities can be found at any animal shelter, which gives you a lot of options to choose from. Most shelters also have information about each cat’s personality and background, which increases your chances of success.

    • We recommend not purchasing from pet stores, as the cats there are no “better” than the homeless animals you’ll find at your local shelter, and they may have come from purebred parents who are kept in inappropriate conditions or not have been given the same amount of veterinary care as shelter cats.
    • If you are committed to finding a specific breed of cat, be sure to find a reputable breeder to deal with.

    Adult or kitten:

    If you have your heart set on a kitten, wait it out until “kitten season” — shelters are often inundated with homeless kittens in the springtime. But remember, in just a few short months that adorable kitten will look just like an adult. Additionally, keep in mind that by adopting an adult cat, you will be able to assess more about his or her fundamental personality than you will be able to for a kitten, which could improve your chances of success.

    Consider your current cat:

    Perhaps the most important step in adding another cat to your home is careful consideration of the resident cat’s personality. Features such as looks, size, breed, gender or any quality other than personality are not factors that should weigh heavily in the decision. Instead, focus primarily on personality matching:

    • If you have a very laid-back, elderly or frail kitty at home, it is best to avoid kittens and very playful or rambunctious cats.
    • If you have a rambunctious cat who zooms all over the house, getting a very laid-back or quiet, shy cat is probably not wise.
    • Try to focus on cats who have personalities similar to that of your current cat.

    THE INTRODUCTION PROCESS

    By planning ahead and taking things slowly, your chances of success when introducing cats are much greater. If you rush into things and attempt to “force” a relationship, you might inadvertently sabotage a relationship that could have otherwise worked out. Here are six steps that can help you ensure a successful introduction:

    Step one: Start by trading scents

    Once you have selected a potential new cat, ask the shelter or breeder if you can take home a blanket the cat has slept on to give to your resident kitty. Also ask if it would be possible to bring a blanket from home that your resident kitty has slept on, to give to your new cat. In some cases, this will not be possible — especially with kittens — due to disease concerns. But if you can exchange the cats’ scents with one another, you will be introducing a very important identification and communication signal right off the bat.

    Step two: Prepare a separate room

    Some cats can be dropped into the middle of a new home and adapt just fine, with everything working out between the kitties. However, such an approach can also end in disaster, injuries or a failed adoption. Before bringing your new cat home, we recommend that you:

    • Find a quiet room in your house (a bedroom or bathroom) where you can keep her safely separated from the resident cat for a few days.
    • Make sure it is a room where the resident cat has been, that it can be easily accessed by all human family members for social interactions and playtime, and that it is set up with food, water, litter, toys and soft beds.
    • Choose a room that has an inch or two of space under the door for feline introductions.

    Step three: Feed them on opposite sides of the door

    Place both cats’ dishes close to the door, on their respective sides. If one of the cats refuses to eat, you can feed her elsewhere, but still place dishes of tuna or some other tasty snack on either side of the door. By having both cats experience something positive (a meal or yummy snack) while they are nearby, they can learn to form positive associations with each other.

    • If either cat is growling or hissing at the other through the door, donot put them together anytime soon; take things very slowly and continue feeding this way. If the problems continue for several days, it is likely the match is not going to work out.

    Step four: Exchange scents around the house

    If both cats are eating well, and appear calm and relaxed on their respective sides of the door, then it’s time for the big scent exchange:

    • The resident cat should now be confined in the room, while the new cat is allowed to roam the house. Each cat should use the other cat’s (scooped!) litter box, food and water dishes, beds and toys, so the only thing being exchanged is the cats themselves.
    • Continue to feed both cats close to their respective sides of the door.
    • While the new cat is exploring your home, you may want to close bedroom and bathroom doors at first so she does not feel overwhelmed. Over the course of a few days, open a door or two at a time and increase the amount of space the new cat has access to.

    If either cat appears stressed, nervous or fearful, you might want to do the exchange described above multiple times, for example:

    • The new cat spends a few days in the room, then a few in the house, then back in the room — while the resident cat is in the opposite location. This can help ensure lots of scent exchange and desensitization.

    Step five: Let them make visual contact

    If everything seems to be going well, and everyone is acting, eating and using the litter box normally, you’re doing great! The next step is to open the separating door, but keep a gate of some sort across it so they can see, smell and have contact with each other. The gate should prevent complete access. (A baby gate is perfect, but usually not high enough for cats, so you may need to stack two on top of each other.)

    • Continue feeding both cats on their respective sides of the door, and continue switching them back and forth.

    Step six: Allow them to meet

    If everything seems fine, and everyone is acting, eating and using the litter box normally, then it’s time to take down the gates.

    • There may be some hissing or swatting, but cats often will work things out by themselves. If there is a fight in which one of the cats is traumatized or injured (and you have followed all of the above steps), then the match will likely not work out.
    • If the cats seem to tolerate, ignore, enjoy or interact with each other – that’s great news!

    Leaving Cats Alone Together

    It’s a good idea to separate the cats at first when you will not be around to supervise them. You want to ensure that you see all their interactions and know exactly what is going on. After you feel that the cats are getting along, you can ease up on this step.

    Getting another cat will have a big impact on your resident cat, so considering your decision carefully and introducing them properly is the right thing to do. Good luck!

    Original Post: https://www.americanhumane.org/fact-sheet/introducing-cats-to-cats/

    References
    1http://www.aspca.org/about-us/faq/pet-statistics.html
    2www.americanhumane.org/animals/stop-animal-abuse/fact-sheets/animal-shelter-euthanasia.html

©2025 | Watauga Humane Resources by Theme Bounce

Back to top